Increasing the Print Speed
 General tips General tips
Selecting Speed & Progress Settings (Windows)
Follow the instructions in this section to select settings that increase the print speed.
Just as printing at a high resolution requires more processing time than printing at a low resolution, printing in color takes longer than printing in black-and-white because the volume of data in a color document is much larger. For this reason, it is important to be selective in your use of color printing if you also require a fast print speed.
However, even if your document requires the highest resolution and extensive use of color—for example, when you are printing a camera-ready composite that includes color photographs—it may still be possible to optimize the print speed by adjusting other print settings and changing the operating environment. Keep in mind that some settings that increase the print speed may also lower print quality.
The following table lists the factors that affect print speed and print quality.
|
Print quality
Print speed
|
Lower
Faster
|
Higher
Slower
|
|
Printer settings
|
Paper & Quality Options
(Windows),
Print Quality (Macintosh)
|
Economy, Normal
|
Photo
|
|
High Speed
|
On
|
Off
|
|
Image characteristics
|
Image size
|
Small
|
Large
|
|
Resolution
|
Low
|
High
|
The table below lists the factors affecting print speed only.
|
Print speed
|
Faster
|
Slower
|
|
Printer settings
|
Orientation
|
Portrait
|
Landscape
|
|
Black Ink Only
|
On
|
Off
|
|
Color**
| Black |
Color
|
|
Mirror Image*
|
Off
|
On
|
|
Edge smoothing*
|
Off
|
On
|
|
Photo Enhance
|
Off
|
On
|
|
Collate*
|
Off
|
On
|
|
Reverse Order*
|
Off
|
On
|
|
Hardware resources
|
System speed
|
Faster
|
Slower
|
|
Free hard disk space
|
Large
|
Small
|
|
Available memory
|
Large
|
Small
|
|
Software status
|
Running applications
|
One
|
Many
|
* Varies depending on the printer software and application.
** Varies depending on the media type.
Selecting Speed & Progress Settings (Windows)
You can increase print speed by selecting certain settings in the Speed & Progress window. Click the Speed & Progress button on your printer software’s Maintenance window. The following screen appears.
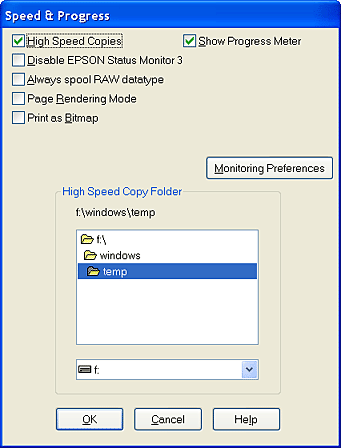
To print multiple copies of your document faster, select High Speed Copies. This speeds up printing by using your hard disk space as a cache when printing multiple copies of a document.
To display the Progress Meter every time you print, select Show Progress Meter.
Disable EPSON Status Monitor 3
Select this checkbox to disable printer status monitoring with EPSON Status Monitor 3.
Always spool RAW datatype (Windows XP and 2000)
Select the Always spool RAW datatype checkbox to have Windows NT-based clients spool documents using the RAW format instead of the EMF (metafile) format (windows nt-based applications use the emf format by default).
You can also use this option if documents spooled in EMF format do not print correctly or if you have insufficient memory or disk space problems.
 |
Note: |
 |
|
When spooling RAW datatype, print progress displayed by the Progress Meter may differ from the actual print progress.
|
|
Page Rendering Mode (Windows XP and 2000)
Select this checkbox when the print speed is extremely slow or when the print head stops for a few minutes while printing.
|
Note: |
|
|
When using this function, the following problems may occur:
|
|
Print as Bitmap (Windows XP and 2000)
Select this checkbox when the print speed is extremely slow or when the print head stops for a few minutes while printing. Try this option if Always spool RAW datatype and Page Rendering Mode do not solve the problem.
EPSON Printer Port (Windows Me. 98, and 95)
For printer models that use the parallel port, select this check box to enable the EPSON printer port optimized for EPSON printers, instead of the default Windows printer port. This speeds up the data transfer rate to EPSON printers. Parallel port users can further increase print speed by enabling DMA transfer, as explained below.
If your computer has a parallel port that supports ECP mode, you can enable DMA transfer to speed up printing. See your computer manual to determine if it supports ECP mode and DMA transfer.
To determine whether you need to enable DMA transfer, compare the message below the EPSON Printer Port check box to this table, and take the recommended action.
|
Message
|
Action
|
|
High Speed (DMA)
Transfer enabled.
|
DMA transfer is already enabled. Click OK to close the dialog box.
|
|
For higher data transfer
rates, use DMA Transfer.
|
Follow the steps below this table to enable DMA transfer.
|
|
(No message)
|
Your system's parallel port setting does not allow DMA transfer. However, if you change the parallel port setting to ECP or Enhanced using your computer's BIOS Setup program, you may be able to use DMA transfer. Consult your computer manual or computer manufacturer for instructions. Once you change the parallel port setting, follow the steps below this table to enable DMA transfer.
Note:
Before you run the BIOS Setup program, uninstall the printer software using Add/Remove Programs in the Control Panel. After running the BIOS Setup program, reinstall the printer software.
|
If you want to enable DMA transfer, follow the steps below.
 |
Double-click the My Computer icon on your desktop, then Control Panel.
|
 |
Double-click the System icon, and then click the Device Manager tab.
|
 |
Double-click the Ports (COM & LPT) icon, then the LPT1 icon. If your printer is connected to a port other than LPT1, double-click the appropriate port icon.
|
 |
Click the Resources tab, and then clear the Use automatic settings check box. Write down the Input/Output Range settings shown in the resource settings box.
|
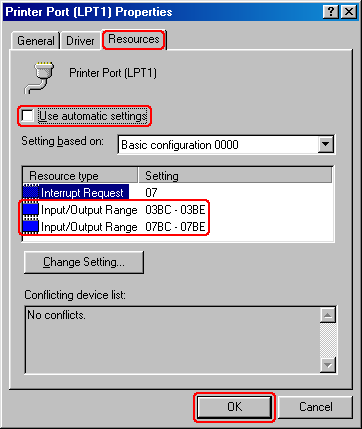
 |
From the Setting based on list, select a basic configuration setting that uses the same Input/Output Range settings as those you wrote down in Step 4, and make sure that the Direct Memory Access channel and Interrupt Request numbers are allocated and displayed. Confirm also that the Conflicting device list text box shows No conflicts.
|
 |
Click OK to save the settings.
|
 |
Reopen the Speed & Progress dialog box to verify whether DMA transfer has been enabled.
|
|
Note: |
|
|
You may not be able to use DMA transfer on some computers even after you make the settings explained above. Consult your computer maker for information on the DMA transfer capability of your computer.
|
|
You can change settings for EPSON Status Monitor 3 in the Monitoring Preferences window. Right-click the shortcut icon on the taskbar, then select Monitoring Preferences.
You can select the settings listed in the table below:
|
Select Notification
|
Displays the current error notification settings.
Select the checkboxes for the error types for which you want to receive notification.
Click the Default button to revert all Select Notification settings to their defaults.
|
|
Select Shortcut Icon
|
To have a shortcut icon placed on your Windows taskbar, select the Shortcut Icon checkbox and choose an icon. You can click the shortcut icon to open EPSON Status Monitor 3, or right-click the icon to access some of the printer utilities.
|
|
Allow monitoring of shared printers
|
Select this checkbox to allow monitoring of a shared printer by other computers.
|
| 

 Top
Top